
나의 발자취
웹 백엔드를 REST api로 변경하기 본문
정답지 유출: 결론부터 말하자면...
all we need to do is
res.render를 res.json으로 바꿔주는 작업이 메인이다.
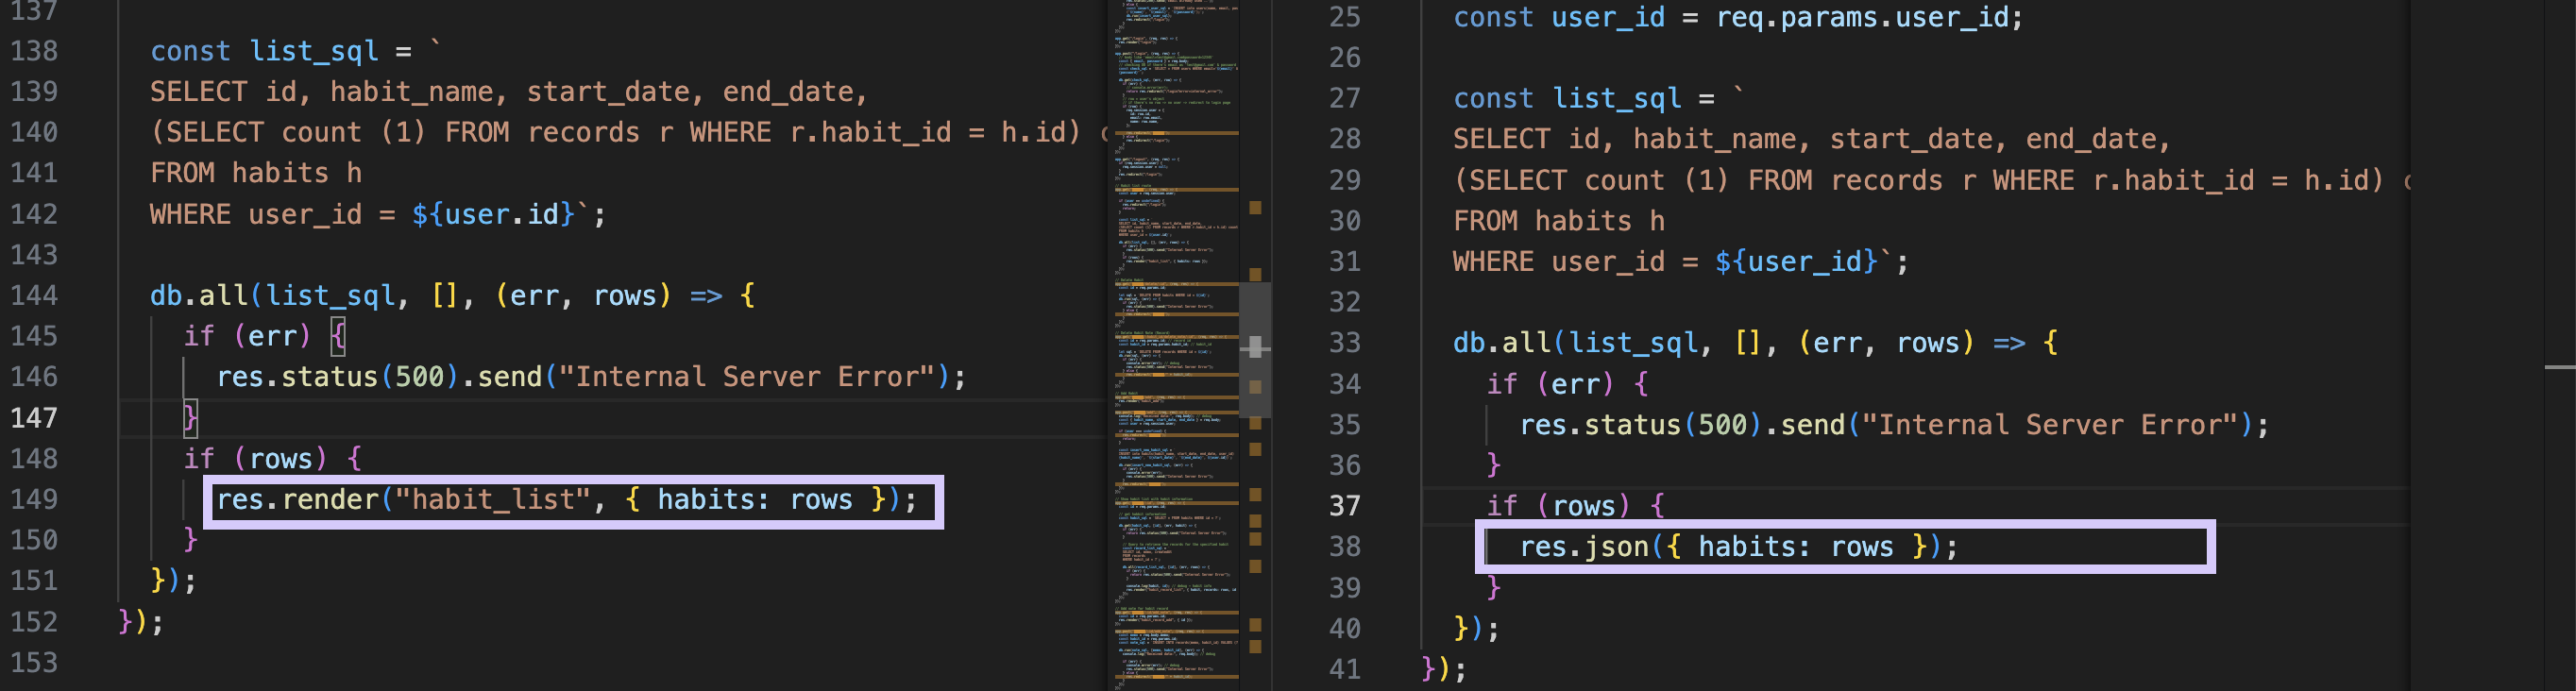
그러므로 필요한 부분만 복사해서, 변경해가면서 작업을 하면 매우 간단하게 마무리할 수 있다.
+ 작업 내역의 로그는 내 깃허브의 api.js 커밋 히스토리를 보면 작업 순서대로 잘 남겨놓았다.
https://github.com/est22/habit_web/commits/main/api.js
GitHub - est22/habit_web
Contribute to est22/habit_web development by creating an account on GitHub.
github.com
스타트
1. nodemon api 업데이트
아래 line 6("api": "nodemon api.js",)를 새로 입력해준다.
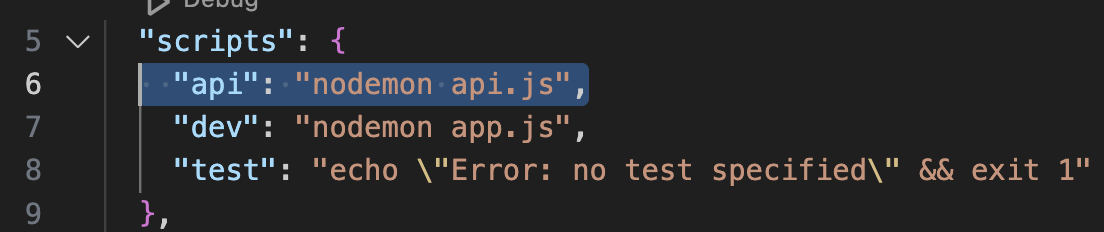
이제 api 실행용 노드몬 명령어는 npm run api로 해줘야한다.

2. app.js가 있는 경로에 api.js 파일을 만들어준다.
기본적인 틀을 작업해주고, api.js 는 별도로 서버에 올려야하니까 기존 app.js가 쓰던 PORT 번호와는 다른 번호로 바꾸어준다.
(*기본적인 틀: 아래 로그 참고)
https://github.com/est22/habit_web/commit/eb8a8c7aeb0fdc25bd1b364a56f45b369046419a
ready for RESTapi · est22/habit_web@eb8a8c7
est22 committed Oct 4, 2024
github.com
3. users DB json 객체로 받기
"/users" 라우터를 만들어준다.
이때 중요한것은, 서두에서 말한 것과 같이 res.json({ users: rows }) 처럼 렌더링이 아닌, json 객체로 받는다는것!!!
const express = require("express");
const fs = require("fs");
const moment = require("moment");
const sqlite3 = require("sqlite3");
const path = require("path");

// DB setting
const db_name = path.join(__dirname, "habit.db");
const db = new sqlite3.Database(db_name);

const app = express();
const PORT = 3001;

app.use(express.json());

app.get("/users", (req, res) => {
  const users_sql = `select * from users`;
  db.all(users_sql, [], (err, rows) => {
    res.json({ users: rows });
  });
});

app.listen(PORT, (req, res) => {
  console.log(`running server...`);
});
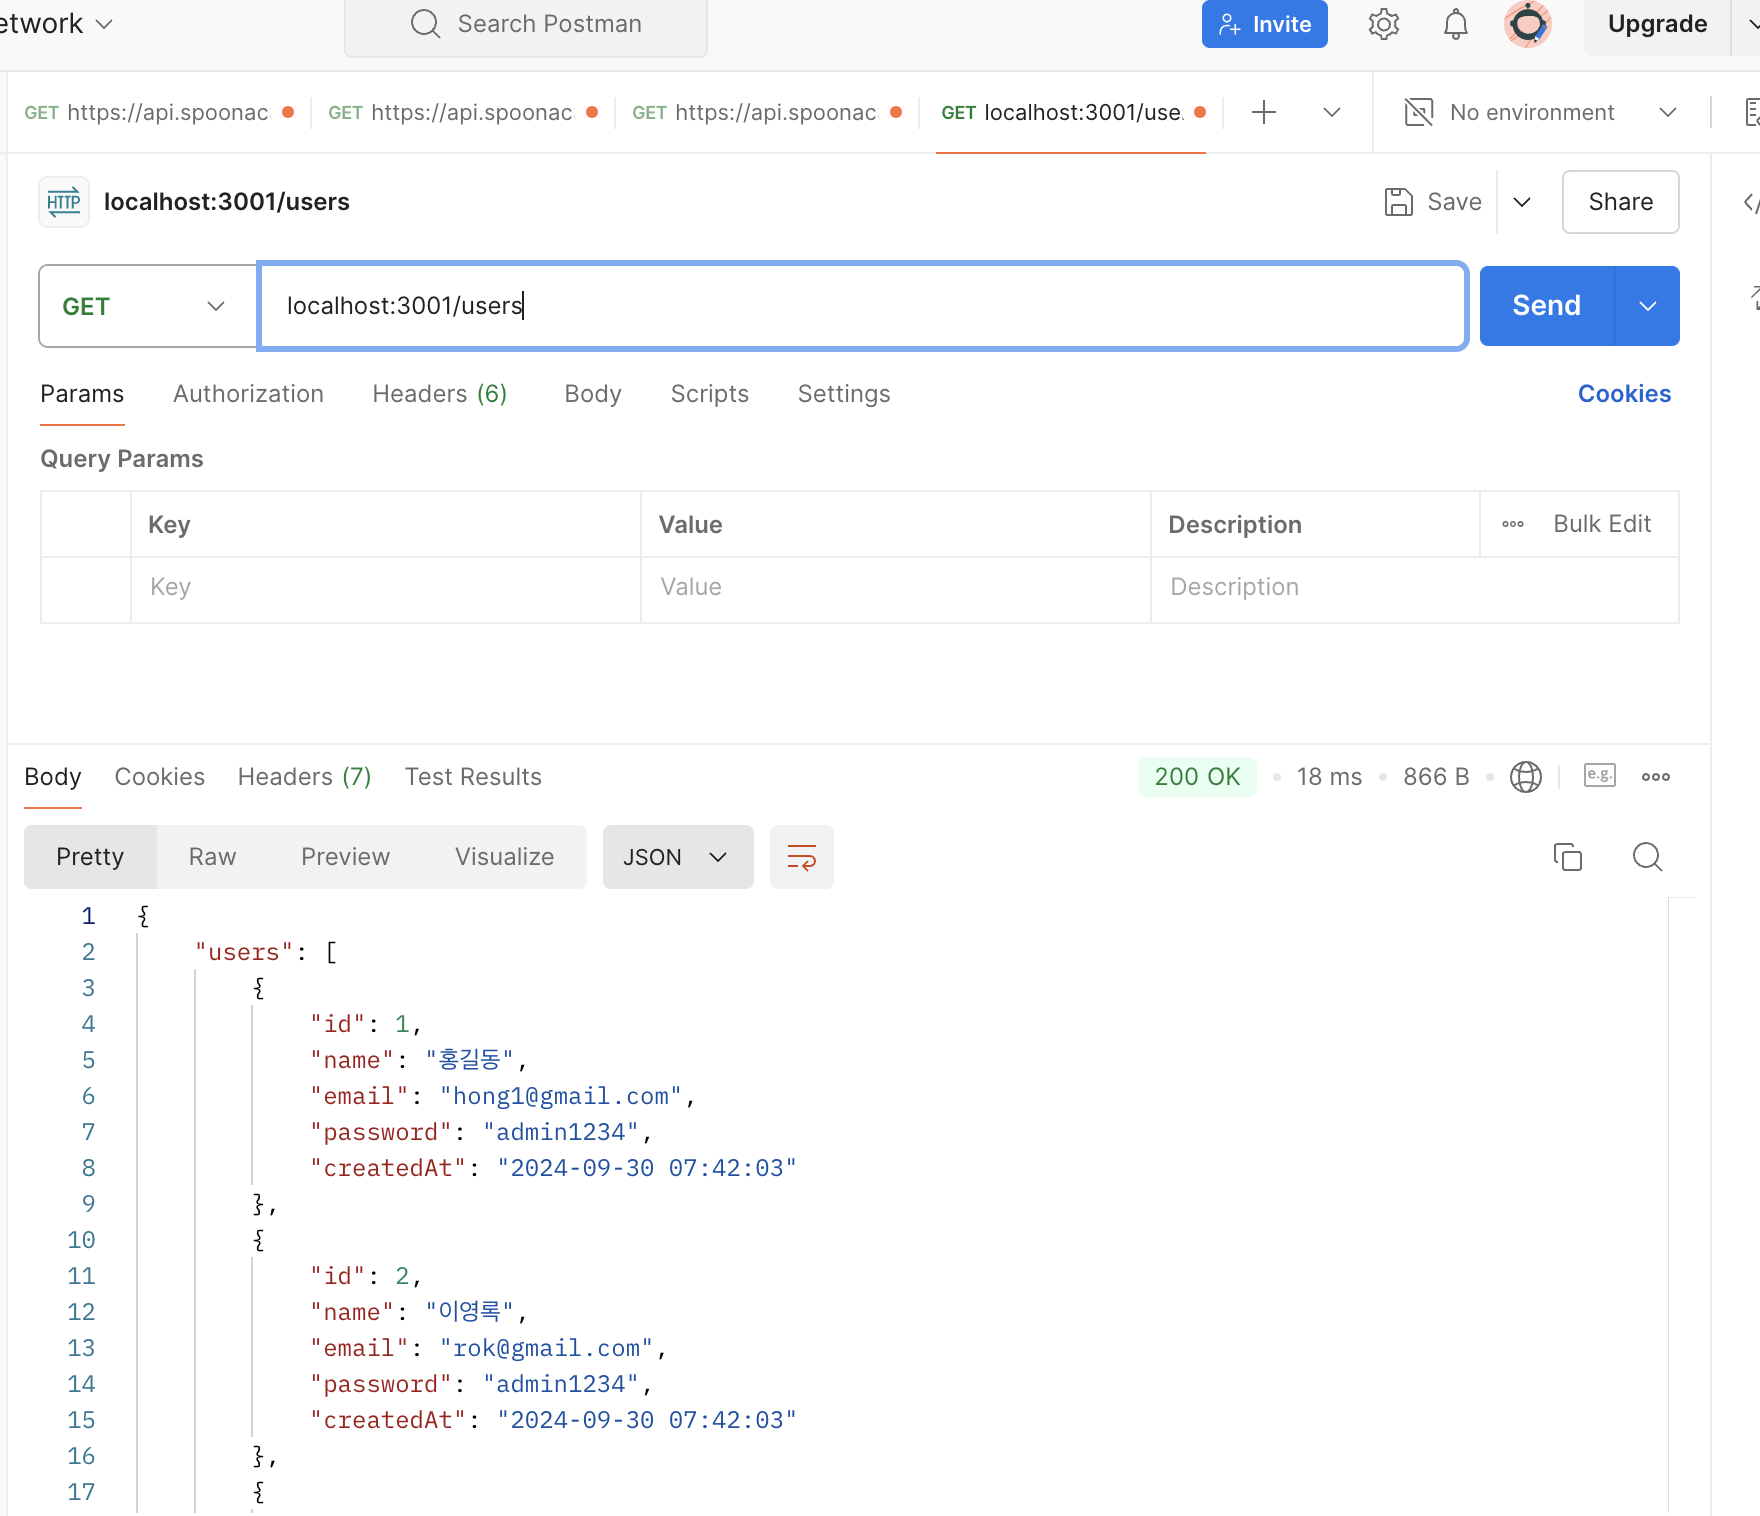
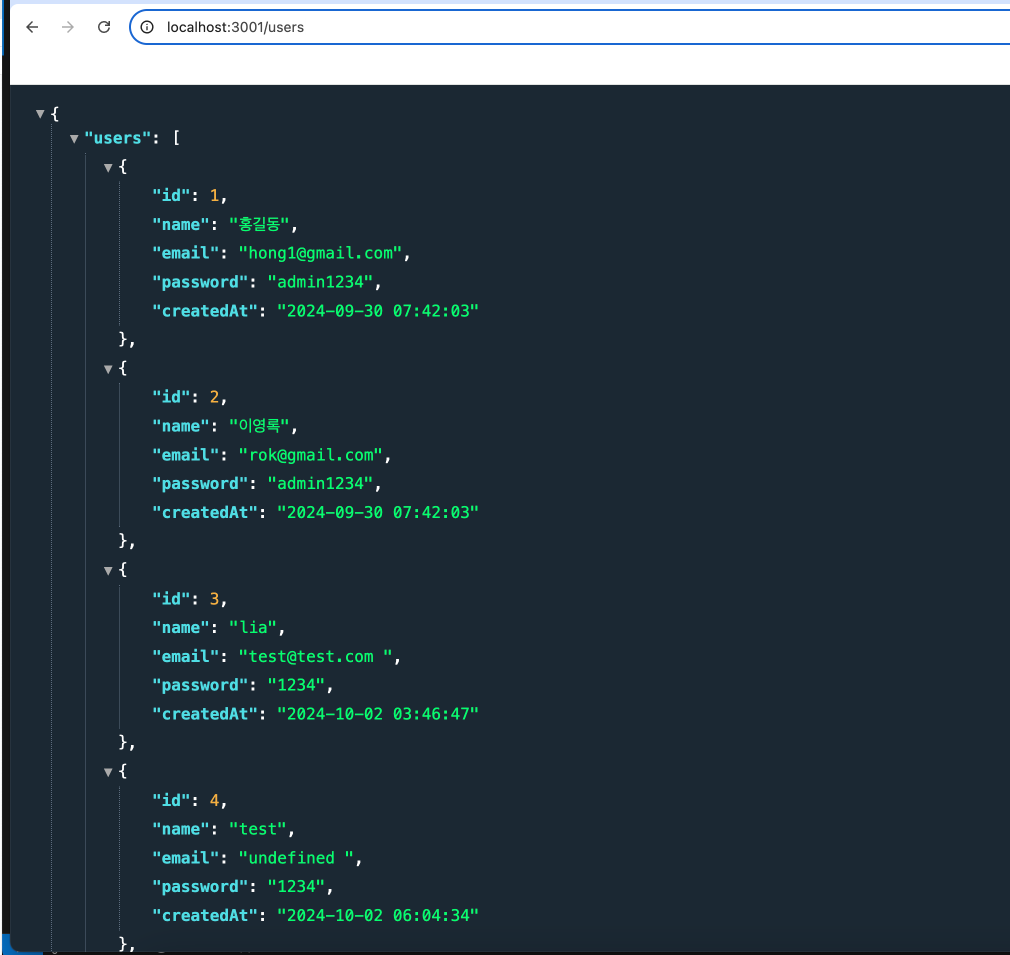
작성 후 postman 열고, GET에다가 방금 구현한 주소(http://localhost:3001/users)를 쳐주면 아래와 같이 API처럼 데이터를 잘 가져오는 것을 확인할 수 있다!
(좌) 포스트맨 / (우) 브라우저
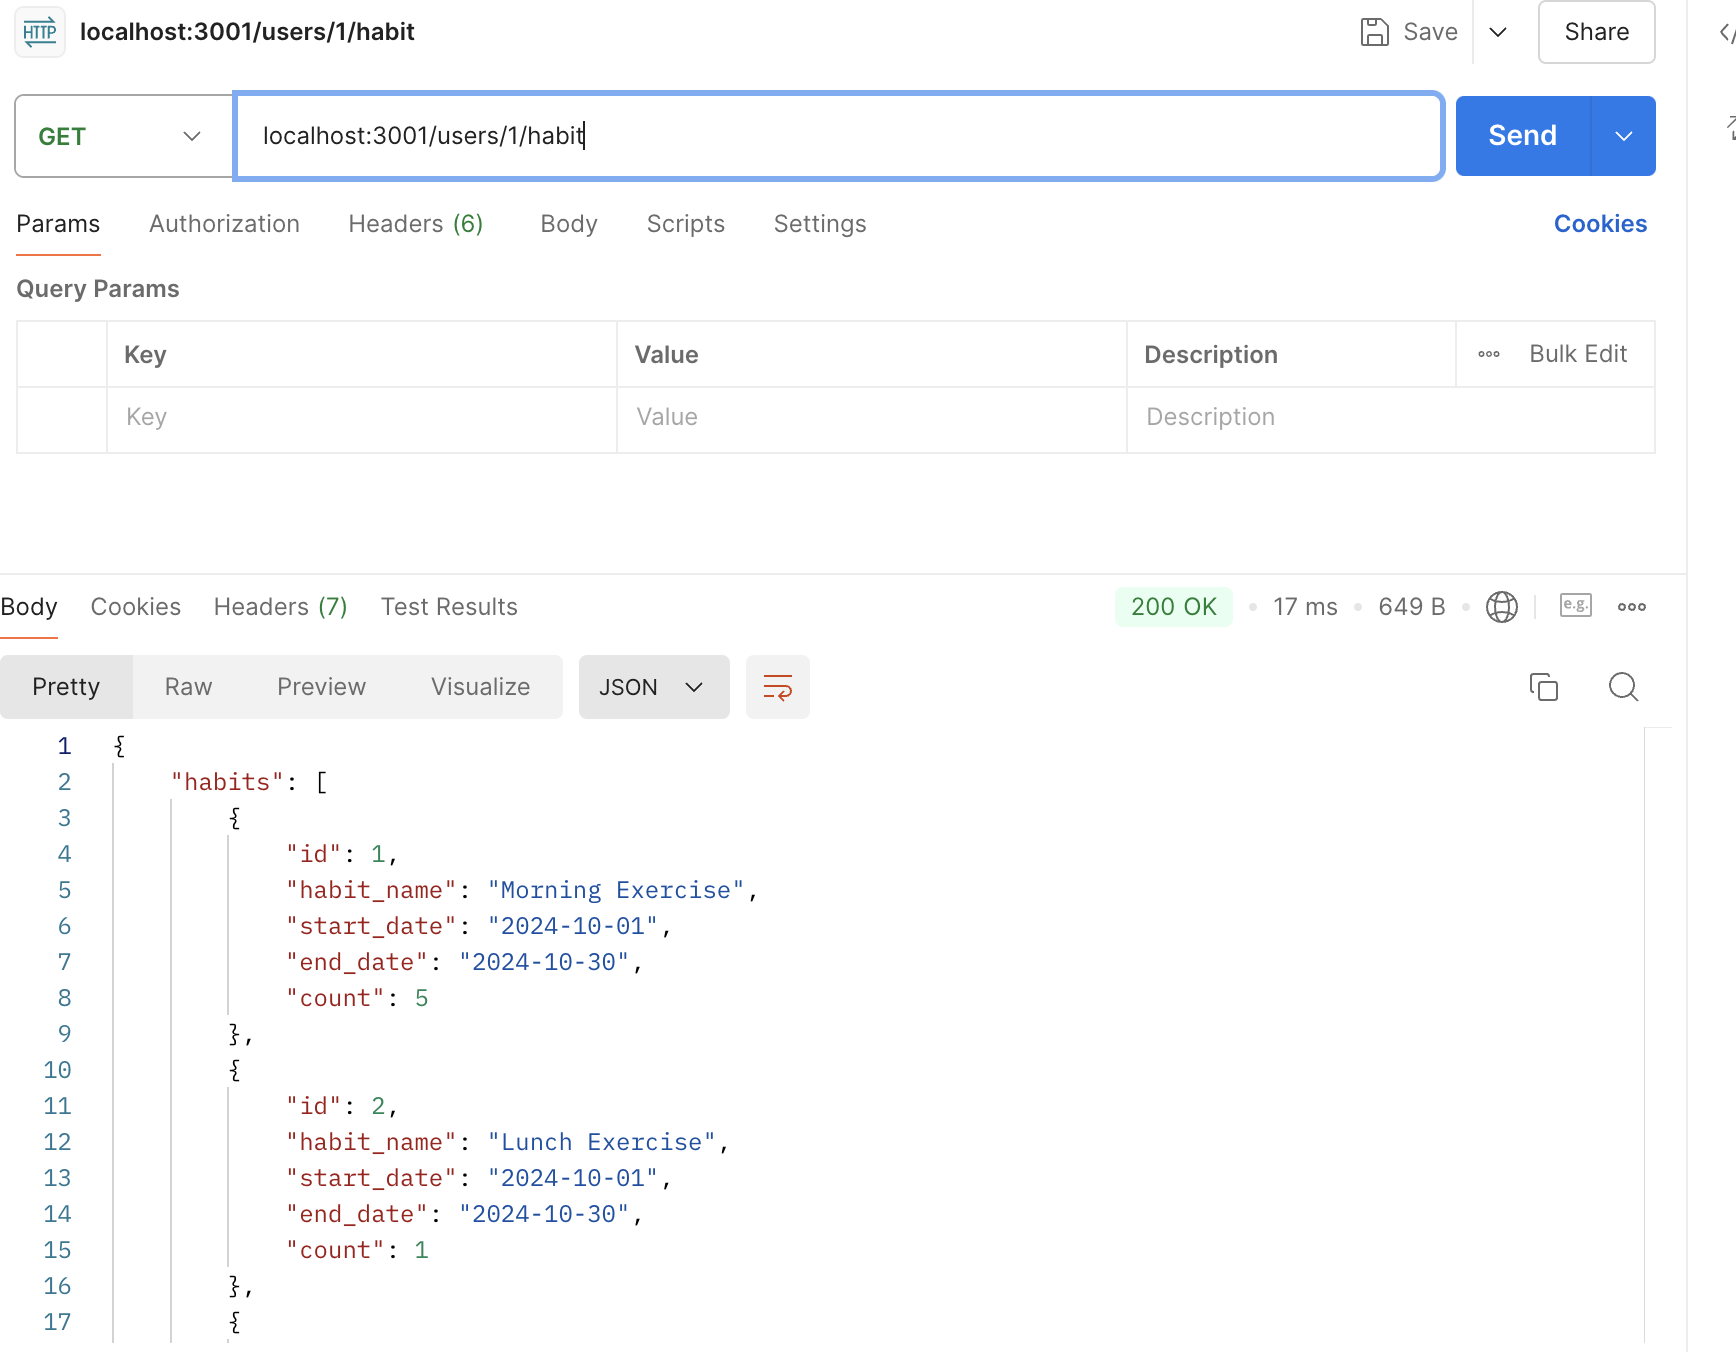
4. habits DB json 객체로 받기
"/habits" 라우터를 만들어준다.
app.js 코드를 복붙한다음, RESTful한 컨벤션대로 URL 파싱을 새로 해주고, id를 user_id로 바꾸어주었다. (이때 까먹지 말고 SQL 쿼리문도 이를 반영해주어야함..;)
그리고 마지막은, 또 res.json({ habits: rows }) ^^
// Habit list route
app.get("/users/:user_id/habit", (req, res) => {
  const user_id = req.params.user_id; // added

  const list_sql = `
  SELECT id, habit_name, start_date, end_date,
  (SELECT count (1) FROM records r WHERE r.habit_id = h.id) count
  FROM habits h
  WHERE user_id = ${user_id}`;

  db.all(list_sql, [], (err, rows) => {
    if (err) {
      res.status(500).send("Internal Server Error");
    }
    if (rows) {
      res.json({ habits: rows });
    }
  });
});

app.listen(PORT, (req, res) => {
  console.log(`running server...`);
});
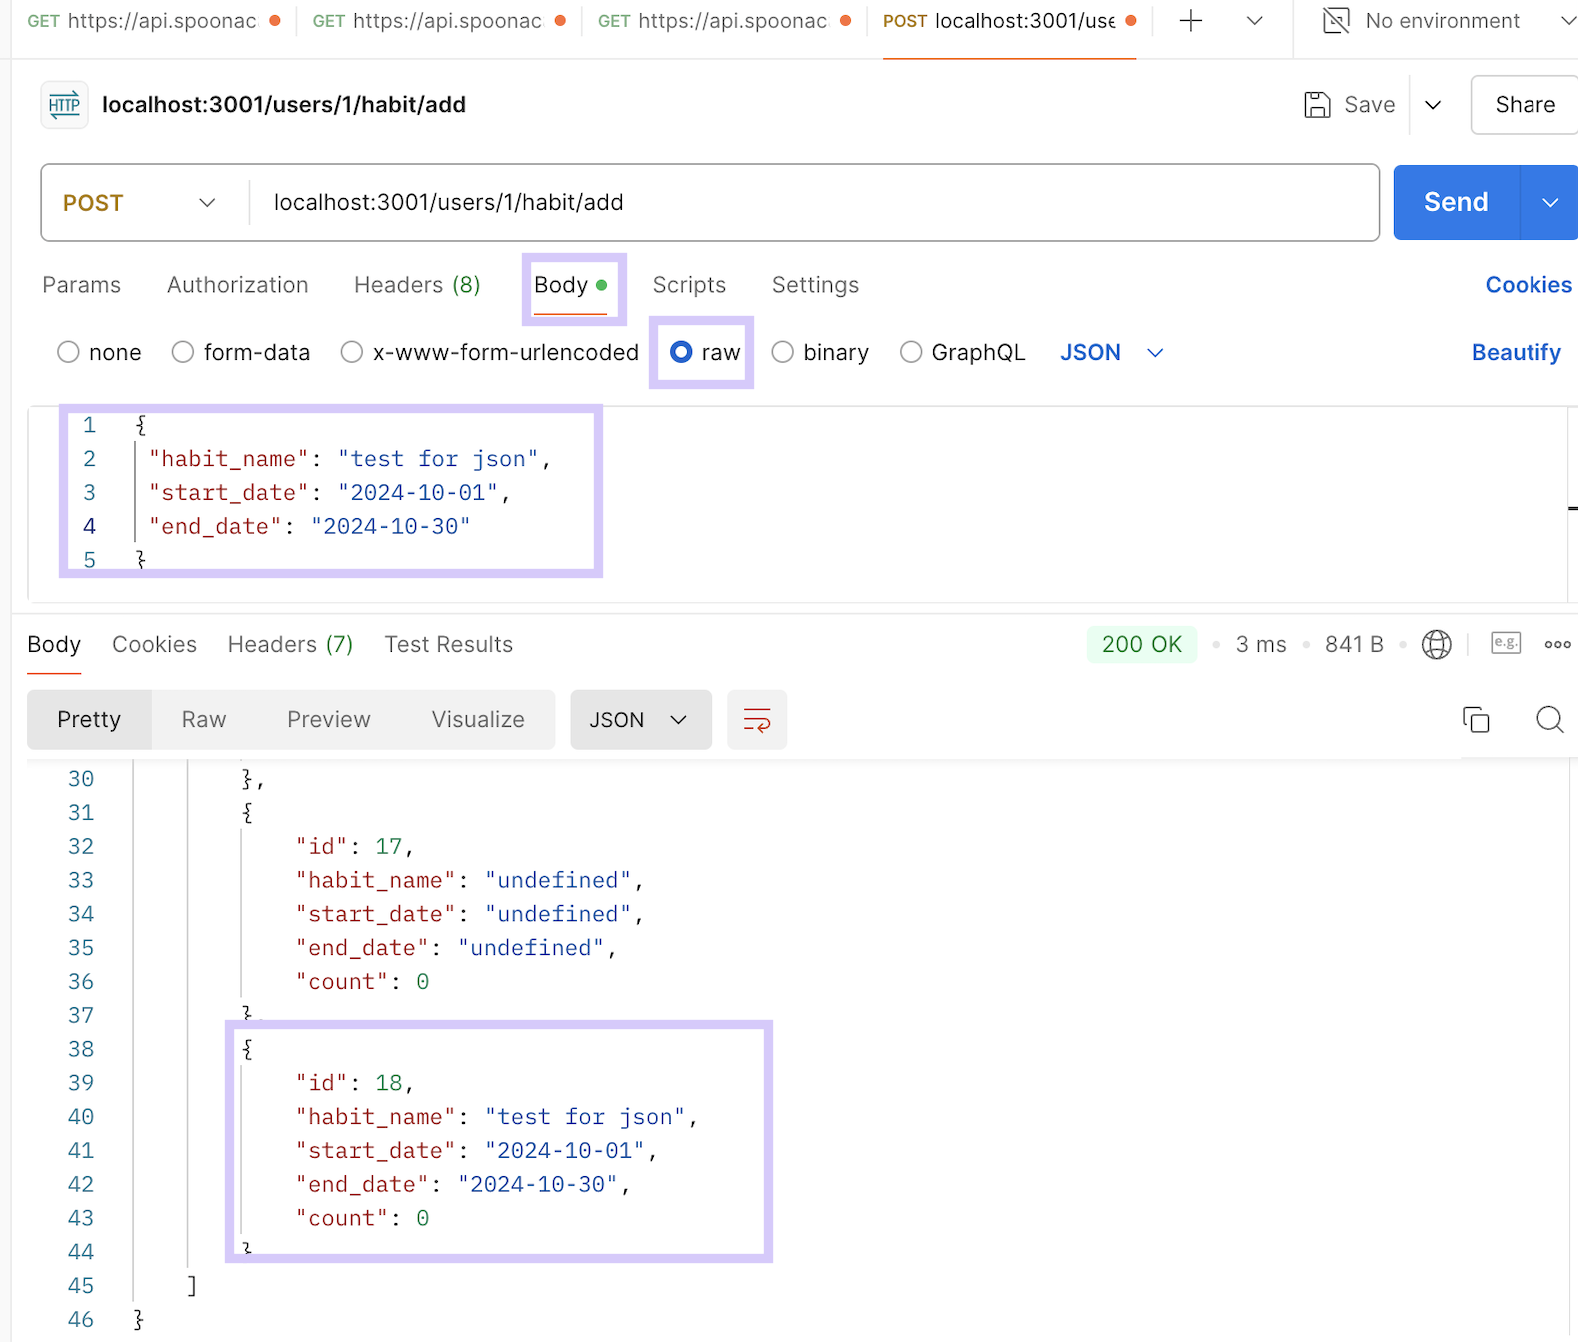
5. add habit 부분 처리하기
이것은 POST 요청이기 때문에, api를 통해 json 객체를 전달해야한다!
// add habit
app.post("/users/:user_id/habit/add", (req, res) => {
  const { habit_name, start_date, end_date } = req.body;

  const user_id = req.params.user_id;
  const insert_new_habit_sql = `
  INSERT into habits(habit_name, start_date, end_date, user_id)  values('${habit_name}', '${start_date}', '${end_date}', ${user_id})`;

  db.run(insert_new_habit_sql, (err) => {
    if (err) {
      console.error(err);
      res.status(500).send("Internal Server Error");
    }
    res.redirect(`/users/${user_id}/habit`);
  });
});
코드를 작성해준 후에, postman에 가서 아래와 같이 모드를 POST로 변경하고 json 객체를 작성해준 후에 전송을 누른다. (이때 Body > raw로 가서 작성함)
그러면 아래와 같이 내가 보낸 json 데이터 객체가 DB에 반영되는것이 보인다!!
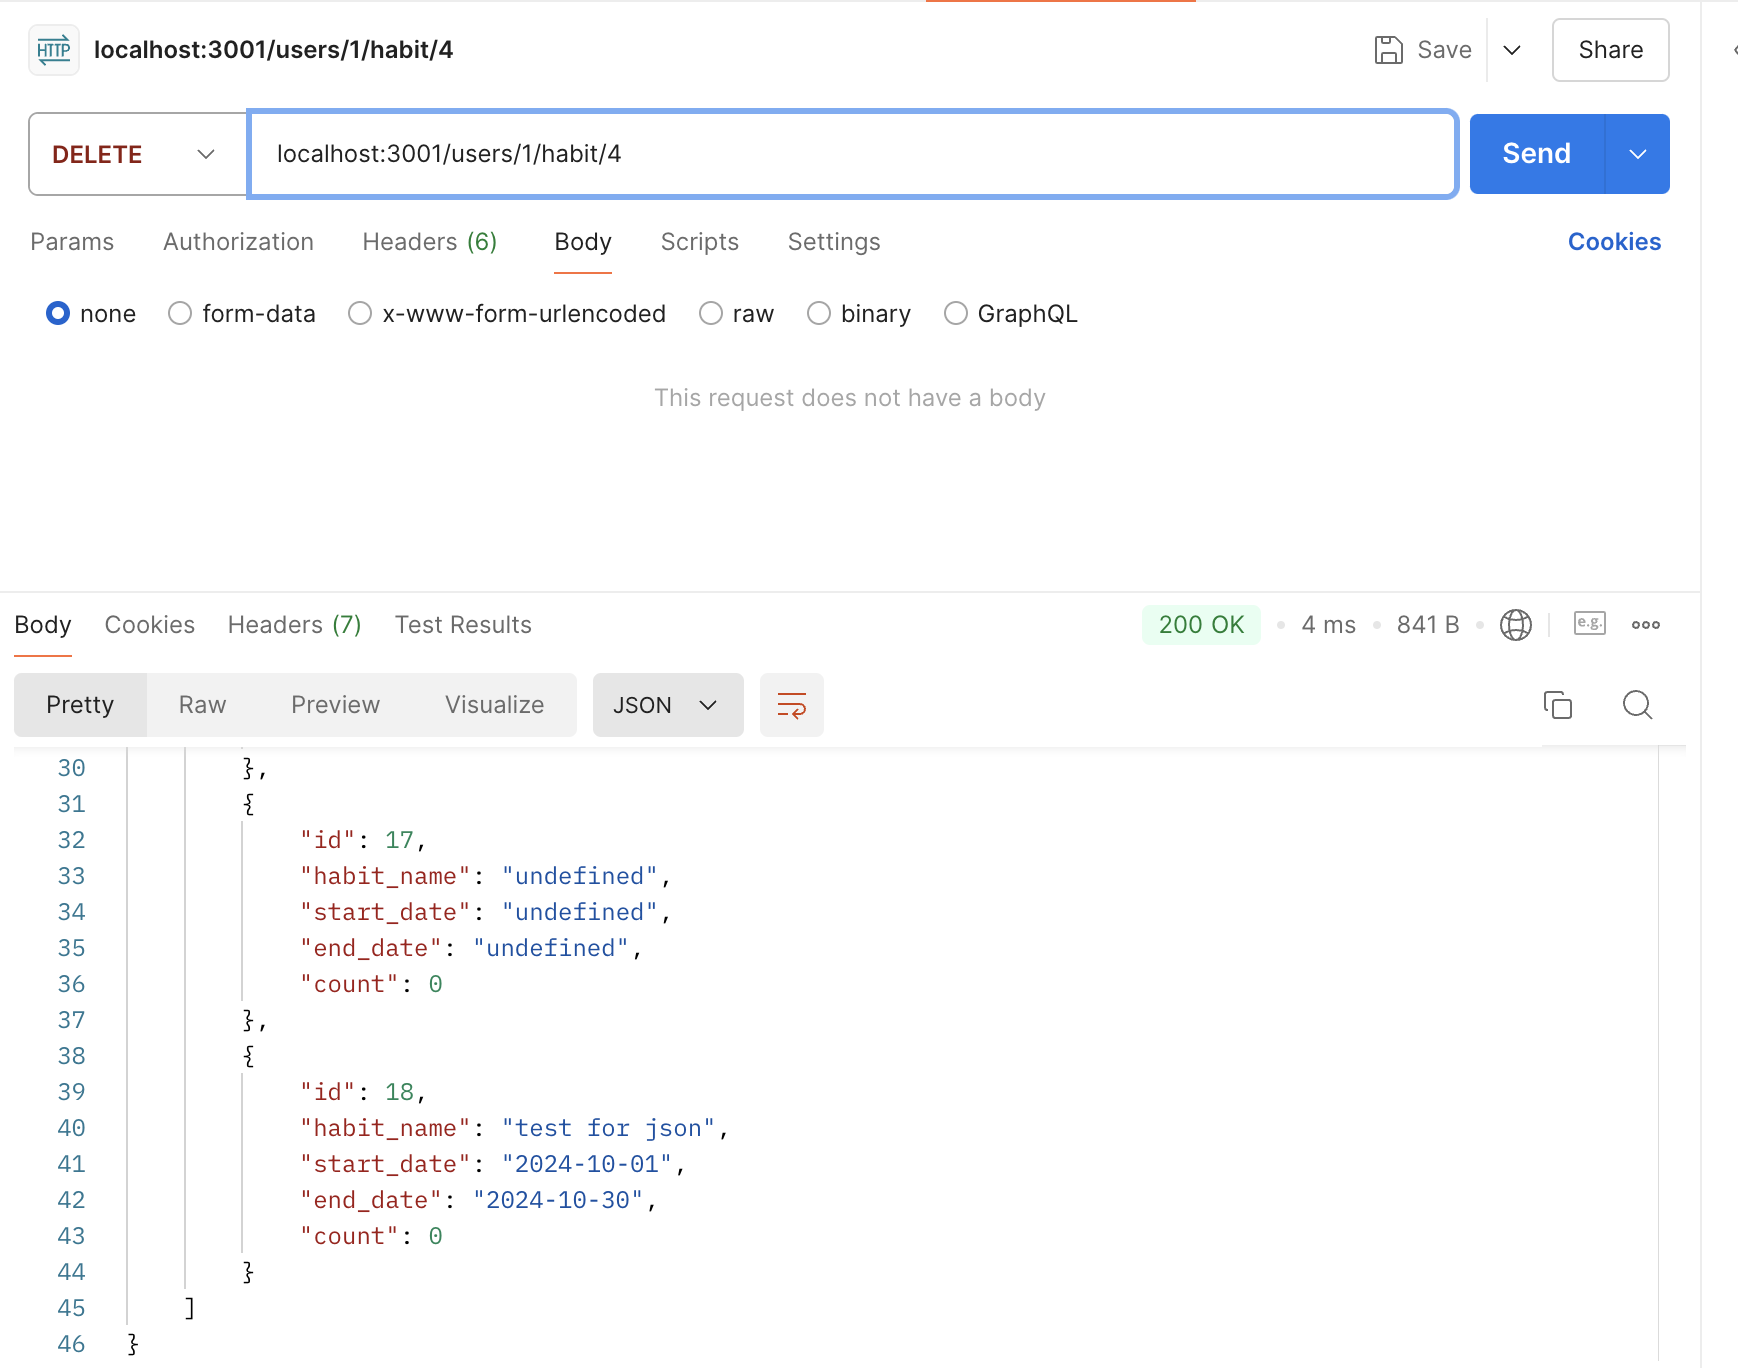
6. delete habits, records 부분 처리하기
이 부분 같은 경우는 사실 삭제는 뭔가를 가져올 부분이 없으므로 api.js에서는 delete 기능을 하나로 합쳐서 구현해주었다.
// delete Habit
app.delete("/users/:user_id/habit/:id", (req, res) => {
  const habit_id = req.params.id;
  const user_id = req.params.user_id; // added

  let delete_record_sql = `DELETE FROM records WHERE id = ?`;
  db.run(delete_record_sql, [habit_id], (err) => {
    if (err) {
      res.status(500).send(`Internal Server Error [records]: ${err}`);
    }
    const delete_habit_sql = `DELETE FROM habits WHERE id = ?`;

    db.run(delete_habit_sql, [habit_id], (err) => {
      if (err) {
        res.status(500).send(`Internal Server Error [habits]: ${err}`);
      }
      res.redirect(`/users/${user_id}/habit`); // added
    });
  });
});
7. 습관 목록 추가
'Backend' 카테고리의 다른 글
| CURL이란? (8) | 2024.10.14 |
|---|---|
| API 종류들(SOAP, RESTful, GraphQL, gRPC, WebSocket, Webhook)과 Restful API의 특징 (2) | 2024.10.14 |
| 자바스크립트 객체 리터럴 res.render("habit_record_list", { records: rows }); (1) | 2024.10.02 |
| SQLite NodeJS 모듈 이용해서 게시판 구현하기 (3) /login (0) | 2024.09.30 |
| SQLite NodeJS 모듈 이용해서 게시판 구현하기 (2) /list (0) | 2024.09.27 |


